Fixing Electric Motors
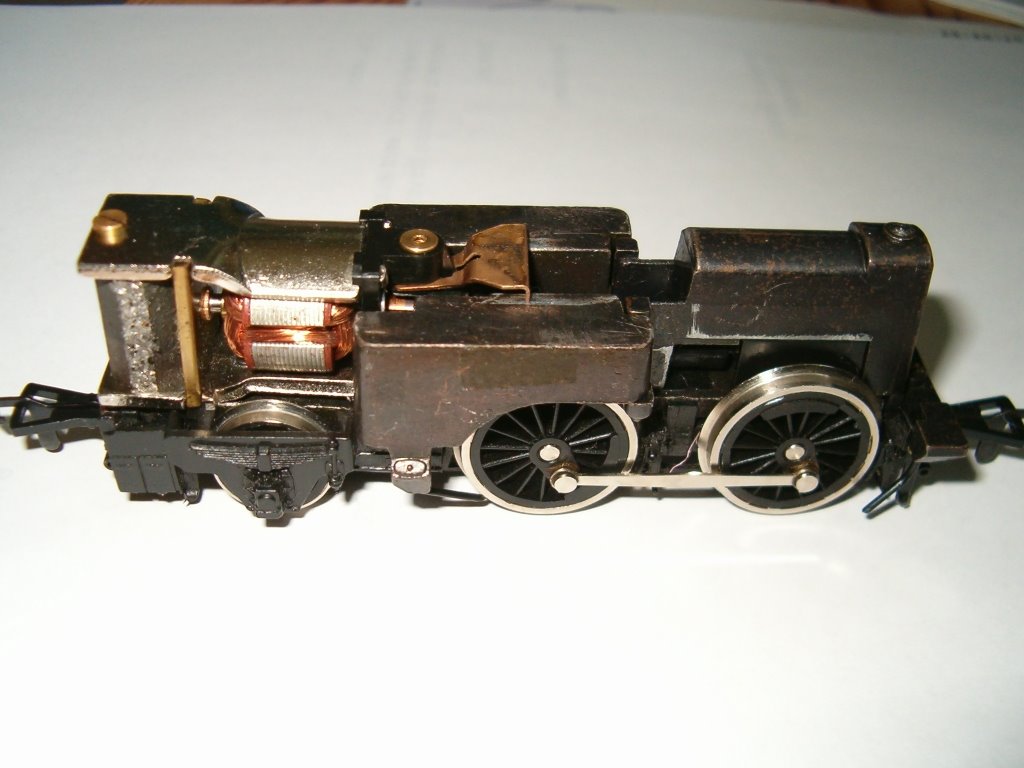
I mentioned earlier that I had a Great Western autotank (14xx) which didn't work. For one reason and another I also had three more chassis for the same engine in the loft - and two of them didn't work either. I could have replaced the chassis with my one remaining working one, but first I thought I'd see if I could fix it.
I'm not afraid of taking trains apart now, having done it a few times in the past. Electric motors tend to be pretty robust, and it's usually possible to get them working again with a bit of oil and polish. I remember making one in physics at school, it went pretty well and I spent most of the lesson tweaking the brushes to get it to go around faster ... but I digress.
 This type of engine has a small screw inside the funnel which holds the chassis to the body (queue request to borrow my wife's precision screwdriver). More screws then hold the motor (back) and front block (containg the worm gear) to the chassis proper. I took it all apart, cleaned the brushes and contacts on the motor, put some current over it, and it spun like mad. Put it back in the engine and nothing happened. So I put WD40 on the joints (WD40 is magic and smells fantastic too). Still nothing. Then I gave the contacts which pick up electricity from the wheels a clean and oil, and now the engine runs. I think it needs a bit of a decent run-around and it should go fine.
 A week or two later, feeling on a roll, I got the other two chassis down from the loft and took them apart too. On the first one, the motor worked, but the wheels wouldn't turn, even when turning the motor over by hand. I thought it might be an axle problem, but when I took the worm gear and motor off the chassis ran fine. The motor ran fine too, so I took a look at the worm gear, and it turned out part of the metal thread was bent out of position. I bent it back with a fine screwdriver (nothing like having the right tool for the job!) and put it back together. Success! This was very satisfying as I'd tried and failed to fix the same chassis a few months earlier - I've clearly learned something in the meanwhile.
So the next day I set to work on the last "dead" chassis. As with the others, the motor by itself spun nicely. However when I took it apart it was missing a spring that provided a contact between the motor and the pickup. I didn't have such a spring handy (funnily enough) so I got some kitchen foil to improvise. I wound the foil around in a roll, then wrapped it around with masking tape (it passes through a hole in the metal chassis which is connected to the opposite polarity). I put the foil plug into the hole, pushed in the motor, fastened the screws, and tested it. No problems! A quick clean for the contacts and all my chassis were working again. That left the question, what do I do with three spare 14xx chassis? But more about that in a future post.
All very satisfying - a bit like bug fixing (I work in software), but working with physical things makes a pleasant change.
I'll try to add some pictures of this later as it will make more sense.
Two more current projects I'm working on and hope to write about soon. First, a scratch-built slatted-sides milk van wagon which I'll pretend is a GWR Siphon B although it's actually based on the one in Thomas the Tank Engine; and a scratch-built GWR 517 class tank engine built to use up a spare 14xx chassis.
I'm not afraid of taking trains apart now, having done it a few times in the past. Electric motors tend to be pretty robust, and it's usually possible to get them working again with a bit of oil and polish. I remember making one in physics at school, it went pretty well and I spent most of the lesson tweaking the brushes to get it to go around faster ... but I digress.
 This type of engine has a small screw inside the funnel which holds the chassis to the body (queue request to borrow my wife's precision screwdriver). More screws then hold the motor (back) and front block (containg the worm gear) to the chassis proper. I took it all apart, cleaned the brushes and contacts on the motor, put some current over it, and it spun like mad. Put it back in the engine and nothing happened. So I put WD40 on the joints (WD40 is magic and smells fantastic too). Still nothing. Then I gave the contacts which pick up electricity from the wheels a clean and oil, and now the engine runs. I think it needs a bit of a decent run-around and it should go fine.
 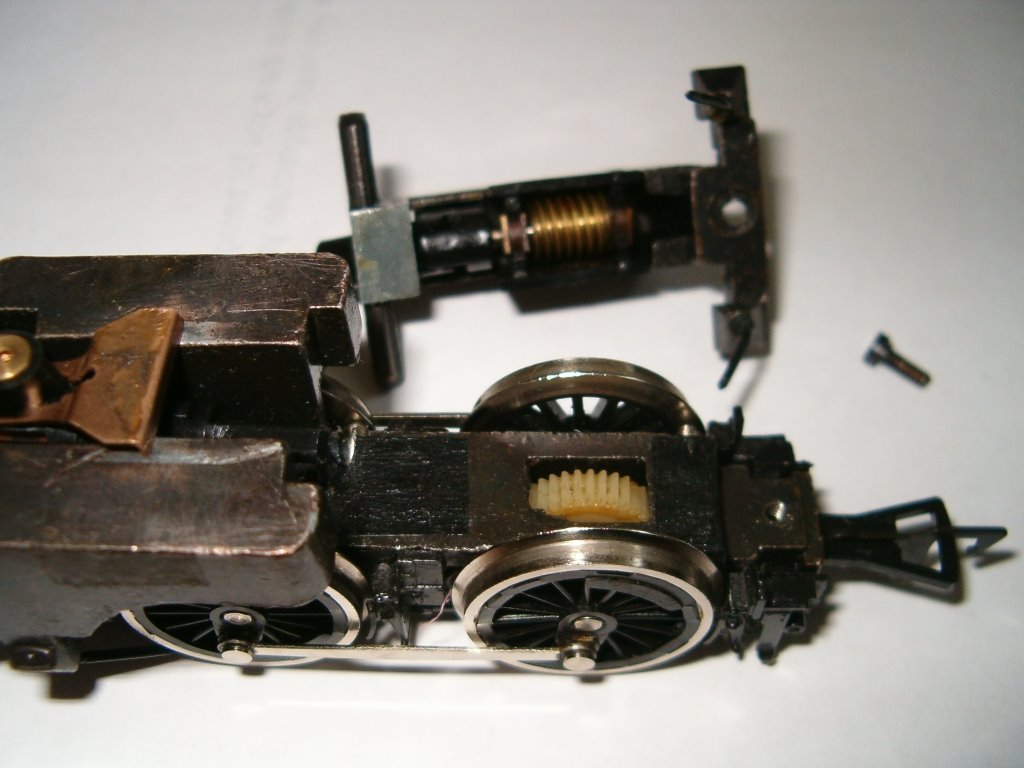 A week or two later, feeling on a roll, I got the other two chassis down from the loft and took them apart too. On the first one, the motor worked, but the wheels wouldn't turn, even when turning the motor over by hand. I thought it might be an axle problem, but when I took the worm gear and motor off the chassis ran fine. The motor ran fine too, so I took a look at the worm gear, and it turned out part of the metal thread was bent out of position. I bent it back with a fine screwdriver (nothing like having the right tool for the job!) and put it back together. Success! This was very satisfying as I'd tried and failed to fix the same chassis a few months earlier - I've clearly learned something in the meanwhile.
 So the next day I set to work on the last "dead" chassis. As with the others, the motor by itself spun nicely. However when I took it apart it was missing a spring that provided a contact between the motor and the pickup. I didn't have such a spring handy (funnily enough) so I got some kitchen foil to improvise. I wound the foil around in a roll, then wrapped it around with masking tape (it passes through a hole in the metal chassis which is connected to the opposite polarity). I put the foil plug into the hole, pushed in the motor, fastened the screws, and tested it. No problems! A quick clean for the contacts and all my chassis were working again. That left the question, what do I do with three spare 14xx chassis? But more about that in a future post.
All very satisfying - a bit like bug fixing (I work in software), but working with physical things makes a pleasant change.
I'll try to add some pictures of this later as it will make more sense.
Two more current projects I'm working on and hope to write about soon. First, a scratch-built slatted-sides milk van wagon which I'll pretend is a GWR Siphon B although it's actually based on the one in Thomas the Tank Engine; and a scratch-built GWR 517 class tank engine built to use up a spare 14xx chassis.
posted by tomdg at 4:18 AM
![]()
![]()

3 Comments:
never thought to WD40 dead engines. Still, it will probably be a long time till my engines get to be used again.
Well, 3-in-1 is probably better for that kind of thing, but WD40 has magical properties on rusty things (and it smells lovely!)
If you'd like me to have a look at them you'd be welcome to bring them round.
Thanks for the offer. I doubt they'll be taken out any time soon, but if I get them out and have any problems I'll let you know.
Post a Comment
<< Home